As an automation enthusiast, I can’t help but appreciate the beauty of streamlining repetitive tasks, such as license assignment in Microsoft 365. User creation and even Office 365 license assignment can be automated with PowerShell. However, more often than not, we find ourselves manually performing these tasks, which can be error-prone.
This issue is particularly challenging for medium and larger organizations, where users are created in the on-premise Active Directory. These new users need to be synced to Azure AD (which we can nudge along), followed by license assignment.
But wait, there’s a twist! What if we run out of licenses? We’ll need to either increase the number of licenses or order extra through our MSP or finance department. And, as you might guess, that takes time.
Once the new licenses are added, we must return to the Admin Center to assign them. This is the part I occasionally forget (nobody’s perfect, right?).
So, what’s the answer to this conundrum? Simple: assign licenses to a group in Office 365! It’s like a small, helpful life hack in the world of Office365.
Ready, Set, How-to!
To kick off your adventure with Office 365 group-based licensing, we first need to create groups that are worthy of receiving these licenses. Fear not, you can create a (security) group in your local AD or Azure Active Directory. And hey, if you’re feeling nostalgic, you can even use existing groups, like those trusty department groups you may already have.
To get started with Azure AD, follow these steps (and maybe hum your favorite tune to make it more fun):
- Log in to the Azure AD Admin Center.
- Look left and select “Azure Active Directory.”
- Choose “Groups”.
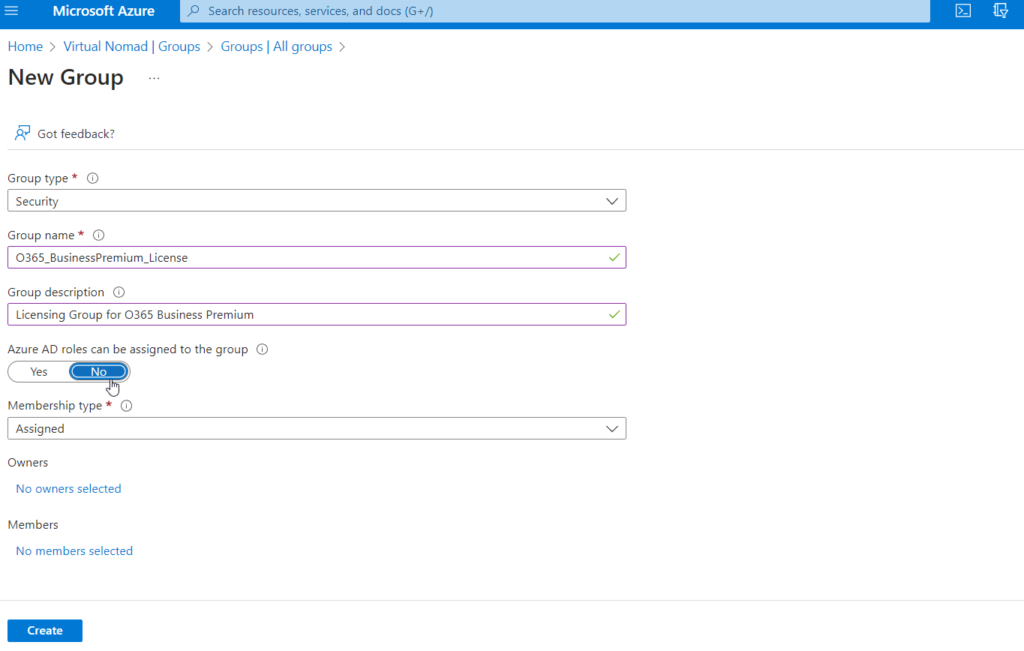
- Click “New group” (so fresh, so clean!).
- Set the Group type to “Security” (safety first, folks!).
- Give the Group a name, for example, O365_BusinessPremium_License.
- Click on “Create” (and maybe give yourself a little high-five for a job well done).

Adding users to the Group
I had Office 365 Business Premium licenses directly assigned to users, so I decided to whip up a nifty little PowerShell script to gather all users with E3 licenses and add them to the new security group (because, why not?).
To get started, make sure you have the Microsoft Online Service module installed for PowerShell. We’ll first need to retrieve the AccountSkuId for the license we want to assign.
# Connect to Microsoft Online Service
connect-MsolService

# Get all AccountSkuIds
Get-MsolAccountSku
The AccountSkuId is a buildup of your tenant name and a product ID. For Office 365 E3 for example, it’s SPE E3, and for Microsoft 365 Business Premium, it’s SPB (fancy, right?).
Next up, let’s corral all those users with Business Premium licenses and add them to our shiny new group. If you’re using an on-premise Active Directory, use the script below;
$msolUsers = Get-MsolUser -EnabledFilter EnabledOnly | Where-Object {($_.licenses).AccountSkuId -eq 'virtualnomad:SPB'}

ForEach ($user in $msolUsers) {
  try {
    $ADUser = Get-ADUser -filter {UserPrincipalName -eq $user.UserPrincipalName} -ErrorAction stop

    Add-ADGroupMember -Identity O365_BusinessPremium_License -Members $ADUser -ErrorAction stop

    [PSCustomObject]@{
      UserPrincipalName = $user.UserPrincipalName
      Migrate           = $true
    }
  }
  catch {
      [PSCustomObject]@{
      UserPrincipalName = $user.UserPrincipalName
      Migrate           = $false
    }
  }
}
For those of you basking in the Azure Active Directory glow, here’s the script you’ll need:
# Get all users with the Office 365 E3 license
$msolUsers = Get-MsolUser -EnabledFilter EnabledOnly | Where-Object {($_.licenses).AccountSkuId -eq 'virtualnomad:SPB'} | Select DisplayName,UserPrincipalName,ObjectId

# Get the Group Id of your new Group. Change searchString to your new group name
$groupId = Get-MsolGroup -SearchString O365_BusinessPremium_License | select ObjectId

ForEach ($user in $msolUsers) {
  try {
    # Try to add the user to the new group
    Add-MsolGroupMember -GroupObjectId $groupId.ObjectId -GroupMemberType User -GroupMemberObjectId $user.ObjectId -ErrorAction stop

    [PSCustomObject]@{
      UserPrincipalName = $user.UserPrincipalName
      Migrated          = $true
    }
  }
  catch {
      [PSCustomObject]@{
      UserPrincipalName = $user.UserPrincipalName
      Migrated          = $false
    }
  }
}
Office 365 Group-Based Licensing: The Fun Way
With the new group created and users either copied or manually added, we can now begin the exciting task of assigning Office 365 licenses to the group. Here’s how:
- Log in to Azure AD Admin Center at http://portal.azure.com
- Open “Groups” (found under Azure Active Directory on the left side).
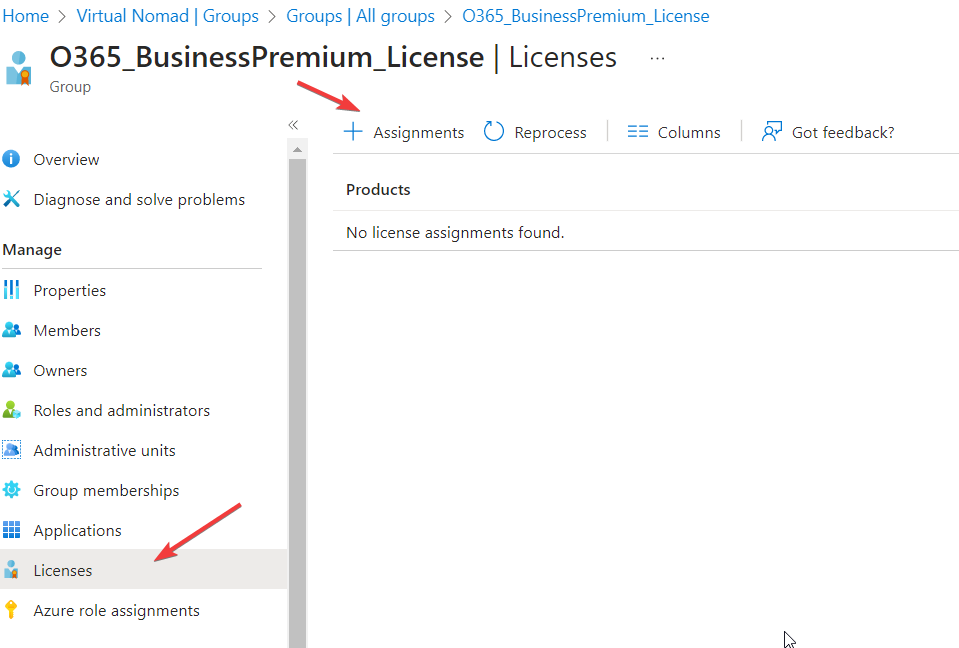
- Open your shiny new group and select “Licenses.”
- Choose “Assignments” to assign a new license (feeling the power yet?).

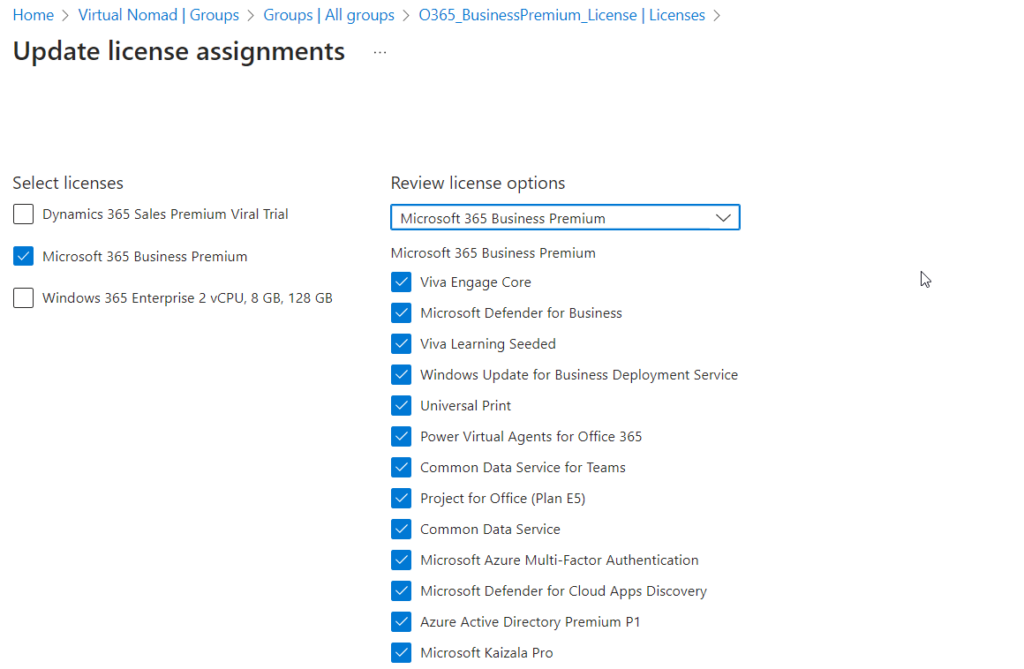
- Pick the license you want to assign to the group (choose wisely).
- Optionally, tweak the license services; for instance, remove Yammer or Sway if they’re not your cup of tea.

- Click “Save” and close the license screen (take a bow, you’re done!).
Allow a few minutes for users to be processed. After a quick refresh, you’ll see that the license changes have been applied. Voilà!
Next up: Inherited vs. Direct Licenses
Users can have directly assigned licenses and inherited ones. Direct licenses are manually assigned, while inherited licenses come from group membership.
If users already have direct licenses, you’ll want to remove them. This ensures that if you remove users from the group later, they won’t keep the directly assigned license.
- Open Azure Active Directory in Azure AD Admin Center.
- Select “Licenses” → “All Products.”
- Open the license you just assigned to the group.
You’ll now see a list of licensed users and their Assignment Paths, indicating whether their licenses are Direct or Inherited. Select users with both direct and inherited licenses, then click “Remove License” to remove the direct one. Users won’t notice any changes, provided the license and services stay the same. Otherwise, test this with a small group first.
The Grand Finale
Users can be assigned to multiple groups, offering more flexibility in Microsoft 365 license assignments. Office 365 Group-Based Licensing is easy to set up and eliminates yet another manual step in user management.
Got questions? Feel free to drop a comment below.

